This walkthrough was written by Kάilo, with additions and editing made by Chirutai.
Major spoilers ahead. This walkthrough was written with the intent of helping players find the occasional event they missed or to provide support for clearing a particular ending. I advise attempting two or three runs of the game before resorting to it to get the best experience out of the storytelling.
We will attempt to keep things organized and easily referenced, understand that on the subject of endings in particular, the game is quite linear and that the ending criteria will often run parallel and will be presented to you alongside the criteria for all four endings.
It is recommended to use ctrl + F to match the particular floor/section/event you seek if you are looking for something in particular.
Let’s begin with a brief rundown of endings and their parameters.
ENDING REQUIREMENTS
True/Canon Ending: Tia must escape the apartment building and return home with high Willpower remaining (over 175). Additionally, she must recover her memories by encountering triggering events throughout the game world. There are four of these, and encountering your first one will give you a clue as to how to trigger the other ones. Encountering one of these flashbacks will add a distinctive colored gem to your HUD. This guide will detail where to find all four memories and provide gameplay advice remarkably similar to attaining the Good Ending.
Good Ending: Tia must escape the apartment building and return home with high Willpower remaining BUT have not fully recovered her memories. It should be noted that this end is distinctly different from the Canon ending. It is recommended to save often.
Neutral Ending: Tia must escape the apartment building and return home with a moderate amount of Willpower remaining (over 75). The collection of memories is irrelevant, and this may be the easiest ending to pursue if you are looking to clear the game for the first time to unlock the gallery. The parameters of this ending allow for ample opportunity to make mistakes and as long as you avoid Game Over encounters, you should have no problems managing your stats through to the end.
Bad Ending: Tia must escape the apartment building and return home with very little Willpower remaining (75 or less). Truthfully, I found myself having to set out very deliberately to achieve this one. You must walk a fine line between triggering every event EXCEPT those that will result in Game Over Encounters while still managing to complete the game with depleted Stamina. The final third of the game will leave little margin for error owing to how drained Tia’s stamina will be and that any singular enemy will be capable of capturing her at the slightest misstep. Save often.
CONTENTS (BY AREA)
- 10F (Memory fragment for True Ending, One Standard Event)
- 9F (One Event, Significant Repercussions)
- 8F (One Standard Event)
- 7F (Game Over Encounter, Optional Prep for Game Over Encounter ahead)
- 6F (One Standard Event, One Potential Game Over Encounter depending on actions of 7F with two variants)
- 5F (Memory fragment for True Ending, One Standard Event)
- 4F (Memory fragment for True Ending, One Standard Event, Opportunity for Stat Recovery)
- 3F (One Standard Event, Opportunity for Stat Recovery)
- 2F (One Standard Event that can result in a special Game Over)
- 1F (2 Game Over Encounters, one depends on previously mentioned repercussions from 9F)
- Backstreets, South-side (Three Game Over Encounters)
- Backstreets, North-side (Memory fragment for True Ending, One Standard Event that can result in a special Game Over, the same two Game Over Encounters as South-side)
The gallery
The gallery is unlocked upon completing the game for the first time. Reaching Tia’s apartment building and watching any of the 4 endings counts as completing the game to this end. Afterwards, the gallery can be accessed from the main menu.
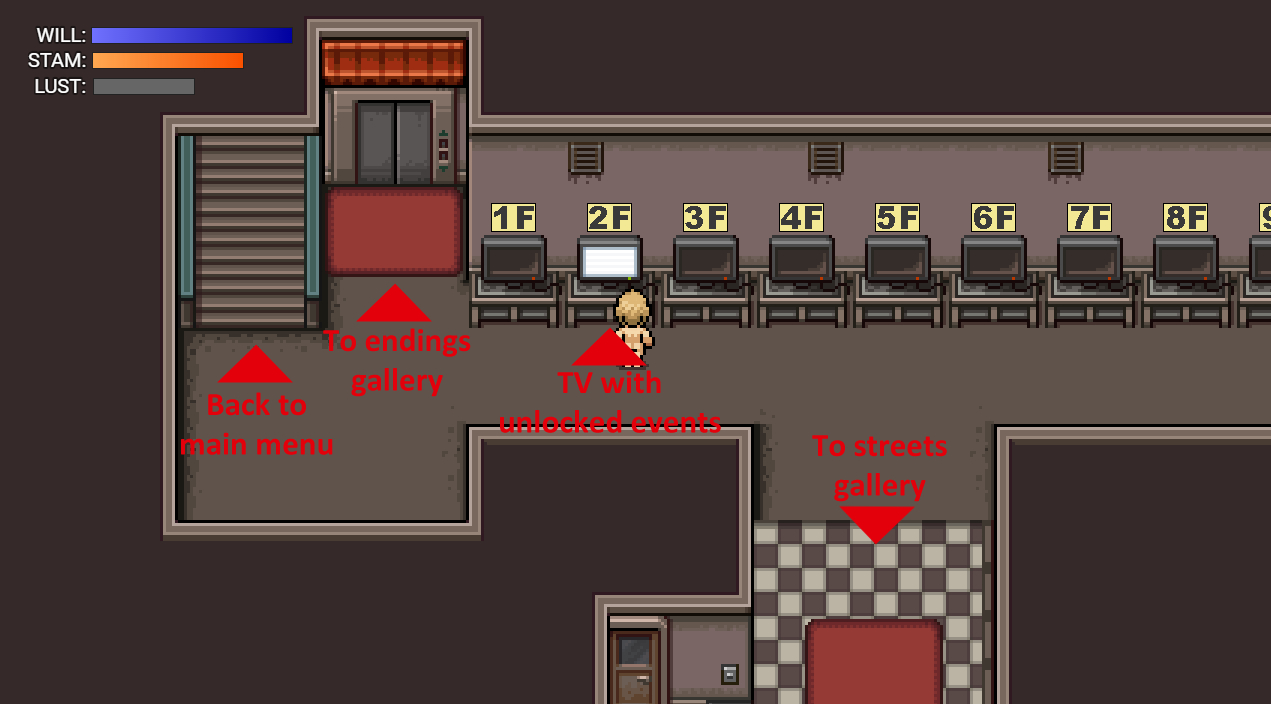
The gallery is separated in 3 areas:
- The main area, in which you spawn on arrival, is for the events of the residential building
- The elevator leads to a small area dedicated to the 4 endings
- Leaving the building through the south leads to the area dedicated to the events of the streets section
The gallery features televisions you can interact with to review events or just the associated CGs. To do so, you must first unlock the event by completing it in any playthrough (no need to complete the game or even save once you have seen the event in its entirety). To unlock a television, you must first unlock the main event associated to it; You will know that you did so when the television is turned on, and thus can be interacted with.
With that said, having all televisions turned on does not mean that you have unlocked everything. In some case, an active TV can still have locked events, notable:
- Special variations of some events, such as the “horny” variations which lead to Tia having an orgasm
- Bonus or secret events on specific floors which feature more than one event
If a TV is on, but you have not unlocked all the events that can be replayed through it, you will be given a hint about how to unlock the event when trying to play it.
How to transfer saves between versions of the game
To use your save files from the previous version with the new version, go inside the old game’s “www” subfolder and copy the “save” folder.
Then, paste the folder in the new version’s “www” folder, and your old saves, including gallery unlocks, will be carried over to the new version.
Breakdown of each floor
10F:
The very first floor Tia finds herself on.
MEMORY FRAGMENT FOR TRUE ENDING: The door immediately behind where you start a new game. Click it three times to trigger a flashback. You will receive hints as to where and how to trigger flashbacks #2 and #3 and #4.
The door just beside Tia will trigger an event “Meeting the neighbor”.
It increases Tia’s LUST by 5 and acts as a tutorial NPC. Proceed downstairs when ready. Save at the bench if you wish.
9F:
Advancing into the hallway will initiate an encounter – the elevator bell will chime and a woman will enter the hallway.
True/Good: It is recommended that you act as soon as the game returns control of Tia to you. Run to the end of the hallway as soon as you can close the dialogue box and hide behind one of the walls or hide in the garbage chute. Wait for the woman to enter her apartment and you will not suffer any consequences or trigger an event. Taking the stairs fast enough is also an option, but only if you are sure that the girl did not see you. You may find this tricky to do with arrow keys, and using click to move while Always Dash is active has proven a much more consistent way of evading her. Saving is recommended before proceeding.
Neutral/Bad: If the woman is able to get close enough to spot Tia, the event “Negotiating with the snapshotter” will trigger. She will then move to enter her apartment, the middle door on the north end of the hallway. Stand in her path to intercept her and start a conversation. Use of force or disregarding the issue will both result in the voyeur entering her apartment with the photos, but the use of force will also cost some stamina to Tia to make things worse. Letting her leave with the photo will have dire consequences for Tia in the future. So, in taking the third option to placate her, Tia will take a hit to her stats but the photos will be deleted and the event will end. Proceed to the next floor when ready.
8F:
Advancing into the hallway will initiate an encounter. An anonymous person will exit a nearby apartment in a hurry and make a dash for the stairs. The door will remain open. Passing in front of the door will trigger the event “Doorstep misunderstanding”
True/Good: It is recommended not to get involved if you are shooting for either of these endings and you have already collected the event. Have Tia mind her own business. Continue walking, save at the bench, proceed to the next floor. Easy.
Neutral/Bad: When the event triggers, you are presented with two dialogue options. The first option will result in Tia being assaulted. The second option will allow Tia to talk her way out of the situation. Should the second option be selected, Tia will be prompted by the tenant to identify the stranger that just ran out of the apartment. This is presented as one out of three dialogue options. They were wearing blue jeans and a black helmet. Select this one and Tia will be released. Failing to correctly identify the stranger will have the same result as the former option, and Tia will be assaulted.
She will have one opportunity to defend herself, presented in one of four dialogue options. Selecting any option but kicking the attacker off her will result in her being overpowered and dragged into the apartment. If Tia is overpowered, expect hefty dings to Willpower, Stamina, and an uptick in lust.
7F:
Once again, advancing will initiate an encounter. The elevator behind Tia will chime and a tenant will step into the hallway. They can be spoken to, but they will not seek to interact with Tia. They will enter their apartment. Tia is able to knock on the door to speak with them but it will not trigger an event. From here, there are two points of interest on this floor. The elevator the man entered the hallway from, and a fuse box at the end of the hallway.
Entering the elevator will result in Tia being assaulted and trigger the Elevator Ride event. Tia will have one opportunity to escape the cabin by choosing the option to convince the man to let go of Tia’s arm. Otherwise, you will be served a Game Over Encounter titled “the janitor’s new toy” after she is assaulted and subsequently abducted. Successfully escaping from the cabin instead will drop you straight to the 4th floor, skipping floors 6 and 5.
If you are interested in discovering an ending/game over on 6F, continue reading. If pursuing any other ending, save your game and proceed downstairs as you prefer.
Interact with the fuse box four times. You will note that despite Tia’s initial disinterest in it, her dialogue changes each time. On the fourth inspection, Tia will be given the option to repair it. Choosing NOT to repair it will trigger the event on the next floor. Repairing it will have the game proceed normally. It is strongly recommended you save your game on this floor BEFORE interacting with the fuse box if you intend on leaving it broken.
6F:
If Tia noticed the fuse in the fusebox on 7F but did not fix it, the lighting on this floor will be disabled. Proceed up the hallway.
Fuse Box: Tia noticed the fuse box needed repair and decided not to fix it.Proceed up the darkened hallway. As you attempt to descend, the “Z ending” will trigger. There are two variants to this, A and B. Which of them proceeds is dependent on whether or not Tia’s stamina is over 145 at this point.
If Tia repaired the fuse box or ignored it, a man will be waiting for the elevator at the end of the hallway. Tia will comment on this when she gets close enough, triggering the encounter for this floor.
True/Good: Emulate Tia, follow up on her wise suggestion. Backtrack up the hallway you came from and remain out of sight until you hear the man enter the elevator. Proceed to 5F, save if you wish.
Neutral/Bad: If going for a neutral or bad ending, this might not be a bad opportunity. If Tia is spotted, the “bad breath” event will trigger. Tia will be groped and escape.
5F:
Proceed down the hallway. Tia only has one way to do this conveniently enough and a nearby note on the wall thoughtfully explains why this is, and in doing so she will trigger the “between two neighbors” event. It cannot be avoided or bypassed, so the outcome of this one is going to be dependent on dialog choices.
MEMORY FRAGMENT FOR TRUE ENDING:
It can be obtained in this encounter; it is the one corresponding to hint #2. See how below.
True/Good: Resolving this event by standing your ground is the key. Not only will doing this earn you your second memory flashback, but it is also a pretty hefty hit to stamina and willpower if Tia cannot manage that. When presented with your first selection of dialogue options, go for the first if you are pursuing Memory fragment #2. If you have been staying out of trouble so far, Tia will refuse to commit to the second option as her Willpower is too high to degrade herself. The third option can work in her interest as well. Favor the dialogue options that resist the cheater, do not allow him to manipulate Tia. Inevitably, the larger neighbor will slap Tia for a slight reduction in Stamina and Willpower. You will be presented with two dialogue options – the first amounting to Tia preferring to be beaten than give in to the creepy neighbor, the second amounting to Tia backing down to the maniac neighbor out of fear of being beaten. Go with the first option. The scene will resolve itself favorably and transition you to the next floor.
Neutral/Bad: A good opportunity to lose a lot of Willpower and Stamina. If Tia is unable to discourage the creepy neighbor or to convince the maniac neighbor to help her, both will assault her in the hallway. Depending on how her Lust is, you might consider taking the second option, and indeed there is a separate gallery unlock for doing so with some changes in dialogue. For a Bad playthrough, I would recommend having Tia initially stand up for herself, but submit after being slapped as every opportunity to reduce Willpower further is welcome, especially if you are still above 150~ at this point. Proceed to the next floor.
There are three outcomes to this event according to the gallery. “Obedient”, “Defiant”, and “Horny”.
4F:
A hallway with some paint cans littering the floor and two notes pinned to the walls.
This floor CAN be passed through without incident, however there is yet another memory fragment to be found as well as an opportunity to recover a modest amount of Stamina.
Knock on the door of the last apartment, 4C. A man will appear and offer you the key to apartment 4A – the one with the paint cans in front of it. Depending on Tia’s Stamina she may either catch the key with grace or have it fall to the floor, in which case she will of course have to pick it up.
Having to pick up the key triggers “the show” event. There is a variant if Tia’s Lust is high enough. If she takes her time retrieving the key, she will be assaulted by the man but still released with the key in her possession unless she runs out of stamina.
Having received the key, feel free to explore the apartment. Examine the fridge if you need some stamina back.
MEMORY FRAGMENT FOR TRUE ENDING:
Hint #3 mentions a secure place to rest and the apartment serves just such a purpose! Head into the bathroom to the left of the entrance, turn on the lights and have Tia get into the tub. Allow her to take as much time as permitted. While relaxing, she will have her third flashback.
As a bonus, the bath will refresh her, restoring a decent chunk of Stamina, and she can masturbate if needed to remove some Lust. Don’t forget to save!
3F:
Immediately below the stairs a character will offer Tia drugs. Regardless of what four endings you are intending to pursue, most of them are safe, although some are obviously more helpful depending on what you are looking to get out of the exchange. If a significant amount of Willpower has been lost by this point, the dealer will insist that he pass whatever pill she chooses by mouth-to-mouth, triggering “the deal” event; if Lust is high enough, you will trigger “the deal (horny)” event.
The pill colors and their effects are as such:
- Blue = Significantly damages Willpower. Triggers “the deal” event unless Tia has high Willpower to resist the effects, in which case she will take a minor loss to Willpower. Note that were she to orgasm as a result of this, it would compound an even more significant loss of Willpower. Note that because of the loss, a Good ending run could be shifted to a Neutral ending from just this event alone.
- Grey = Significantly reduces Lust
- Purple = Significantly increases Lust. May trigger “the deal (horny)” event if Tia already had >50 Lust before taking it.
- Orange = Restores a modest amount of Stamina.
If Tia is at high Lust, they can make use of the room at the end of the hallway by the stairs to relieve themselves in private, however, doing so will trigger “the dealer’s bitch” event whereupon she will take a heavy drain to Willpower and Stamina, but clear her Lust. This event has slight dialog variations based on what happened with the drug dealer prior to entering the room.
It is strongly recommended to save at every available opportunity from this point onward, as the stakes will be much higher from here until the end and Game Over Encounters will largely replace events, or at the very least the events themselves will tend to become Game Over Encounters with little warning.
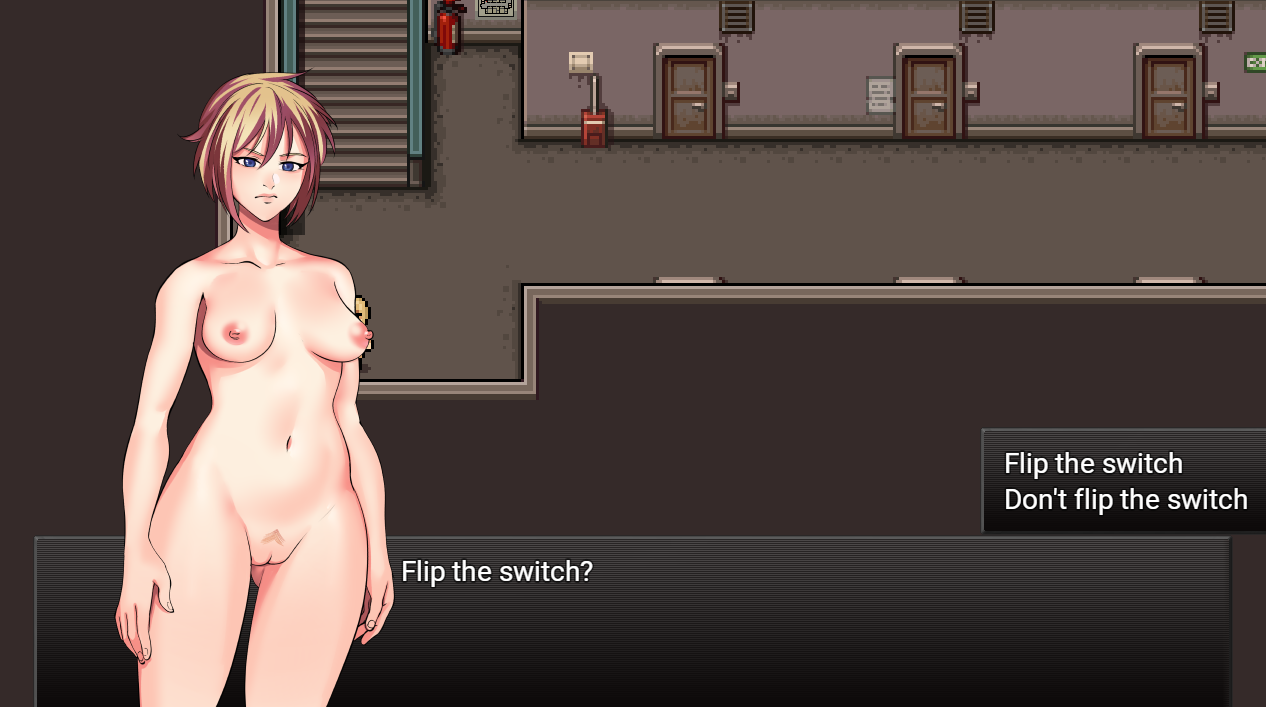
2F:
True/Good/Neutral: Take note of the nearby fire extinguisher and where exactly you should click to interact with it, as it will soon be needed to secure Tia’s safe descent to the next level. As she progresses through the hallway, it will become apparent that a number of gang members are loitering around the staircase. Continue until prompted by Tia’s dialogue that something needs to be done about them. Return to the fire extinguisher and inspect it, removing the safety pin. Approach the gang members and they will move to assault Tia after a few lines of dialogue, as soon as you have control of her sprint back to the fire extinguisher as quickly as possible and inspect it.
This in turn will trigger the “repelling the gang” event demonstrating Tia fending off the gang members with her trusty fire extinguisher and making a mad dash for 1F.
Alternatively, you can interact with the south wall next to the electrical closet at the beginning of the floor to interact with a secret fuse box instead of unpinning the fire extinguisher, offering the option to turn off the lights on this floor. To escape the floor, Tia must then proceed to the staircase that goes down without bumping into the patrolling thug, and before he turns the lights back on.
If any of the gang members catches Tia, the player will instead trigger “the gang’s new toy” event.
Bad: Calling for an exceptionally low Willpower score by the end of the game, this is one of your last big chances to really reduce it. You will want to have it below 100 by the time you hit the first floor. However, “the gang’s new toy” event is especially punishing as it will leave Tia with only 1 Stamina point remaining for the remainder of the game. This in turn can make the last leg of her escape especially difficult. It should also be considered that the event will be followed by a Game Over Encounter if her Willpower is less than 50 at the time of her capture.
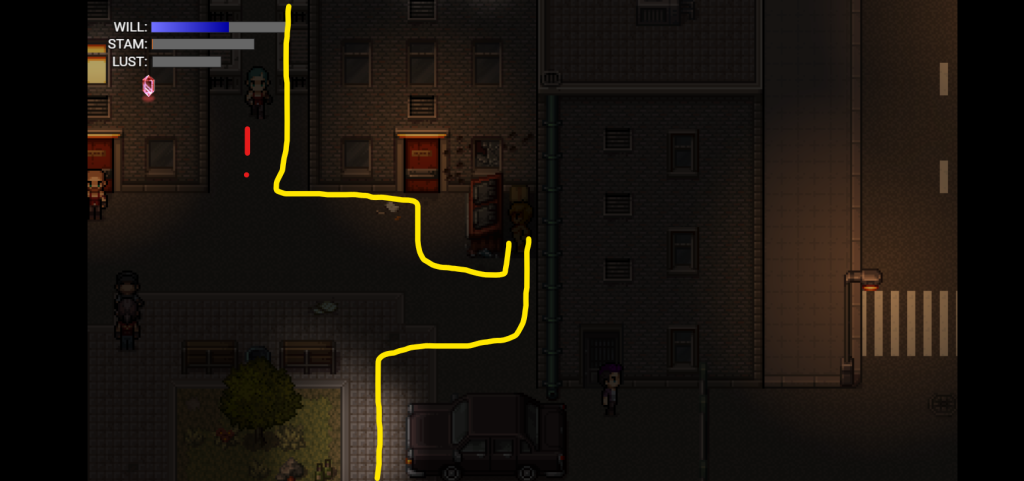
Nonetheless, if she is captured, she may yet have a chance to escape! Provided that her Willpower was not TOO low, she will awaken in the den she was assaulted in, pictured here:
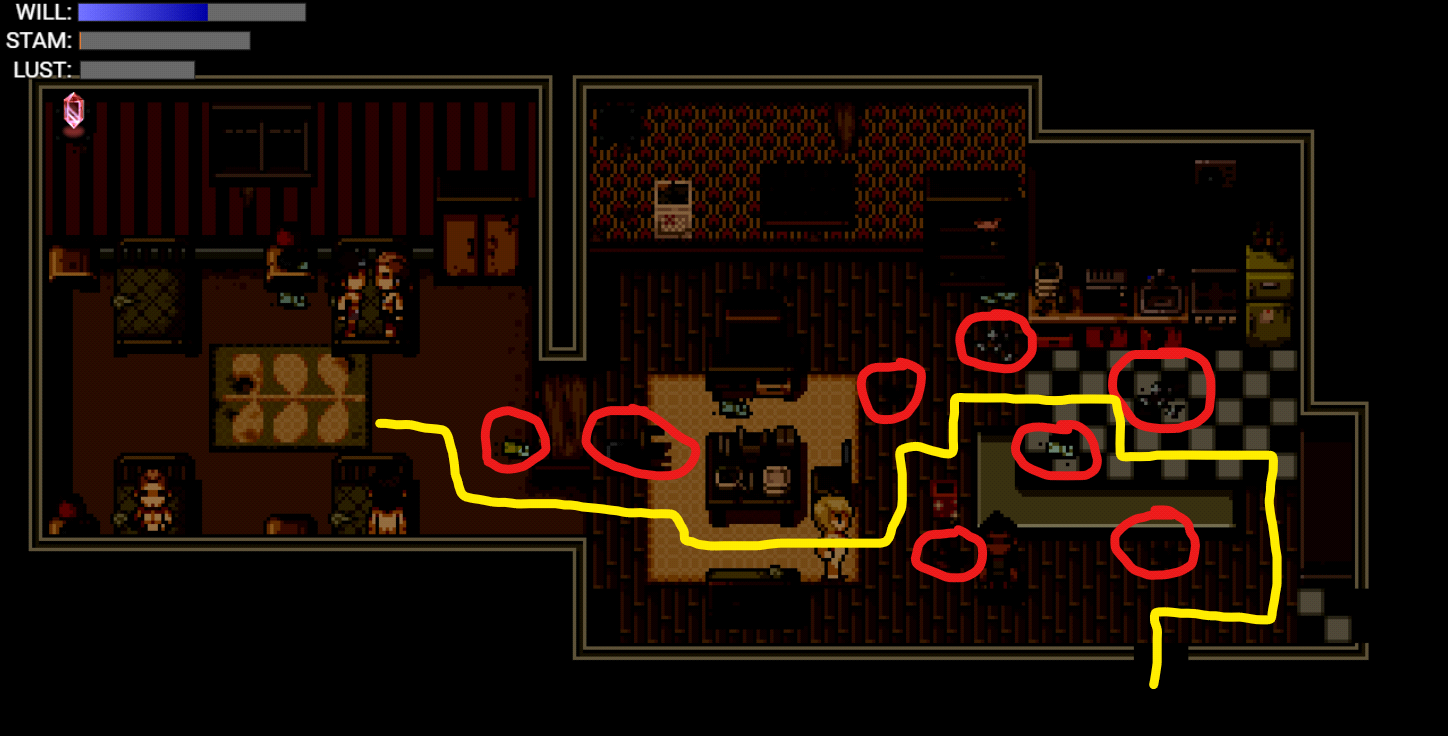
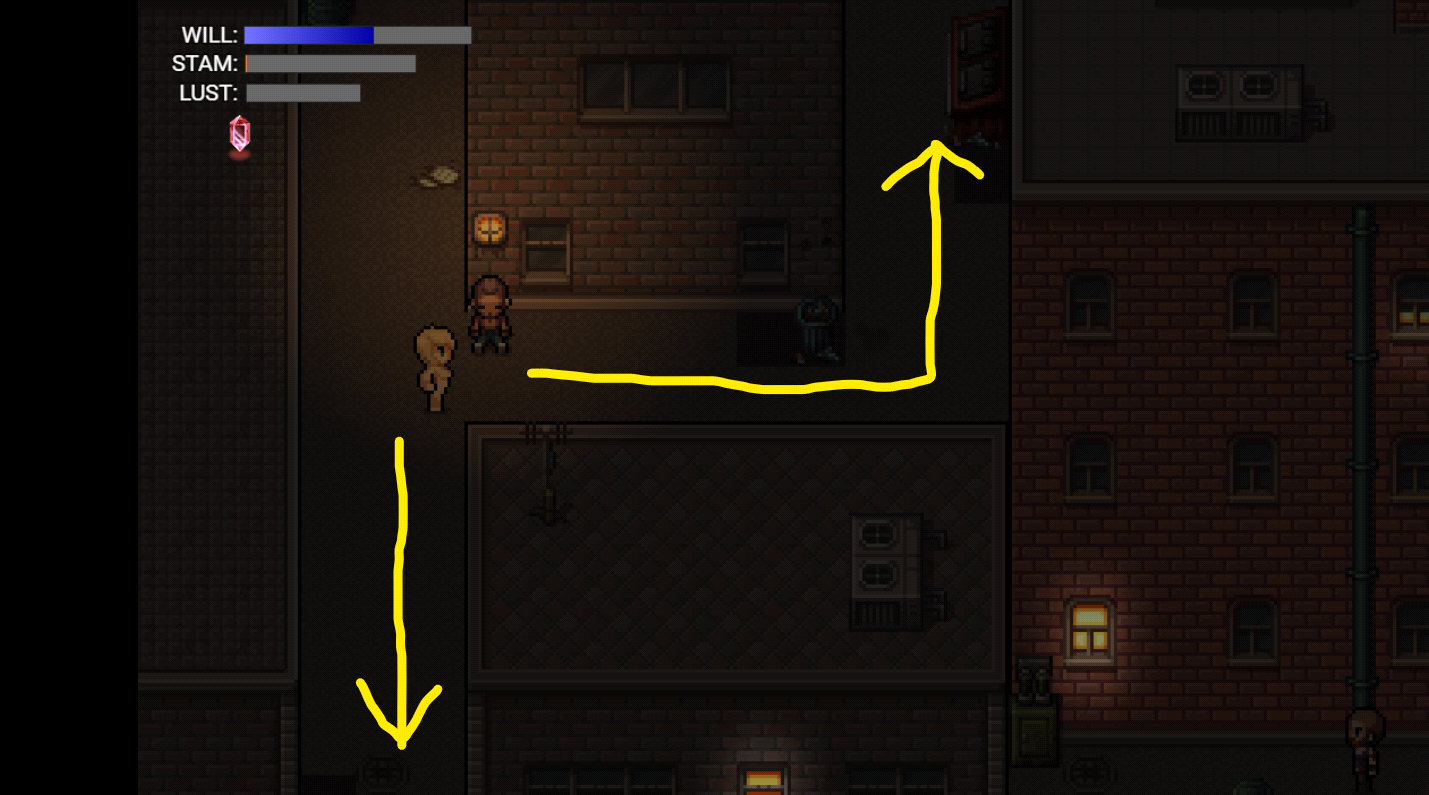
Awakening in the bedroom, she is provided with a chance – only one chance – to escape the gang. To that end, she must navigate through the apartment and to the front door without waking any of the gang members and being subdued. I have outlined an optimal path that will guide you from the bedroom to the front door. Do note that there are hazards encircled in red as well, take care that Tia not step on these as they will certainly alert the gang and foil her chance at freedom. Investigate the space or stray from a direct path out at your own risk.
If Tia is unable to escape the apartment, the same Game Over Encounter will trigger as if she lacked the minimum Willpower to make the attempt.
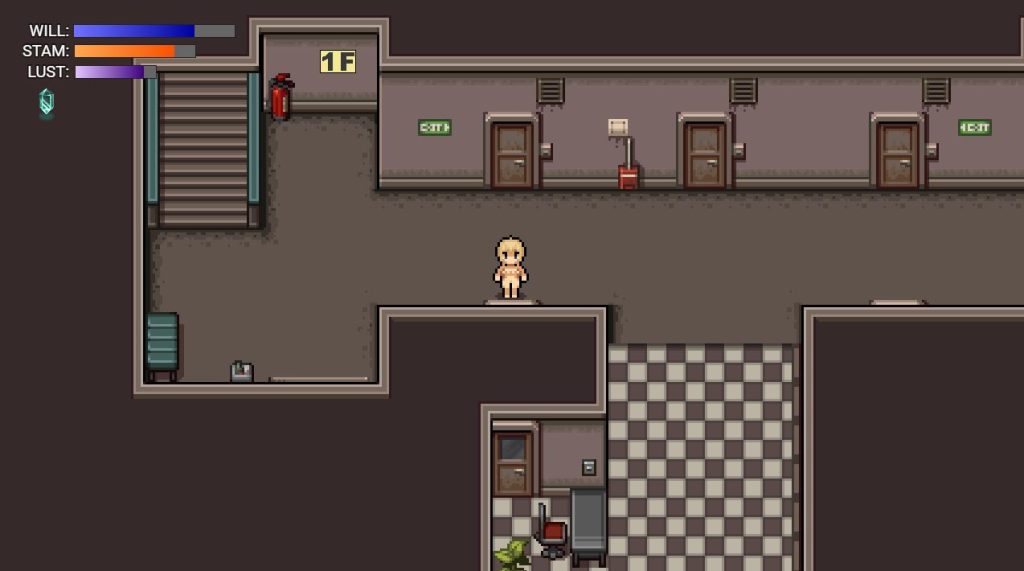
1F:
It will readily become apparent here whether your run is doomed to reach any of the endings depending on how things went on 9F.
If Tia was unwilling or unable to prevent the nude photos of her being uploaded, she will find a sizeable crowd waiting for her in the lobby.
Depending on how she was able to descend from 2F, you can expect one of two events to trigger. Tia’s Stamina, Willpower, and Lust, will not help her here.
If Tia was able to use the fire extinguisher to fend off the gang members, she will be subdued by the crowd and trigger the “the cost of fame” event, which is mechanically similar to previously mentioned “the gang’s new toy.” Roughly 100 Willpower will be expended and she will be reduced to 1 Stamina. If this reduces her to under 50 Willpower, she will meet the same Game Over Encounter prescribed there. Otherwise, she will be given the same opportunity to escape the apartment and upon returning to the lobby, find safe passage to the front door.
If Tia was captured and triggered in “the gang’s new toy” event but managed to escape the apartment, she will still find the crowd waiting for her in the but trigger a different game over, the “the cost of fame (collared)”.
If she was able to ensure the photos from 9F were deleted, the player will find 1F empty and make their way to the front door and exit to the streets unencumbered.
You can also unlock “the custodian’s fuckdoll” game-over by interacting with the door in the south wall, to the left of the main hallway leading out.
Backstreets, South-side:
Proceed east. Note that you will pass by a tent in the parking area – these will replace the waiting benches as save points from this point onward. Save and continue into the backstreets.
Approach the gang members, prompting dialogue from Tia, and pay very close attention to the resulting advice. This is now effectively a stealth section and you must make use of the shaded tiles to circumvent the gang members controlling this area. Be patient. Observe their patrols. Identify the patterns in their movements. They can only see 4 tiles ahead and on the sides. Seize windows of opportunity to get around them when you are certain you’ve found an exploit to slip past.
Depending on how her Stamina, and Lust are faring, Tia may be able to contend with getting caught two to five times and resist capture before triggering one of two Game Over Encounters.
Red thugs drain Stamina and purple thugs increase Lust. Reaching 0 Stamina or 100 Lust from an encounter with a thug results in a Gamer Over Encounter.
These are the “fending off the lecherous gang” and “fending off the merciless gang” events respectively, depending on the allegiance of the gang member responsible for ultimately subduing Tia.
Regardless of what the desired ending is, it is in the player’s interest to avoid allowing Tia to be captured as she is almost home, however, a few optional and easily missed events remain to be found should you want to finish your gallery collection – as well as acquire Memory fragment #4.
From here, there are two equally viable routes to reach your waypoint, the northeastern corner of this area.
It is a matter of preference as to which the player might prefer, with the northern path populated by red thugs, and the southern path by purple thugs. For the purpose of pointing out an event I will detail a route and strategy for the south, but you can choose your path based on Tia’s current state.
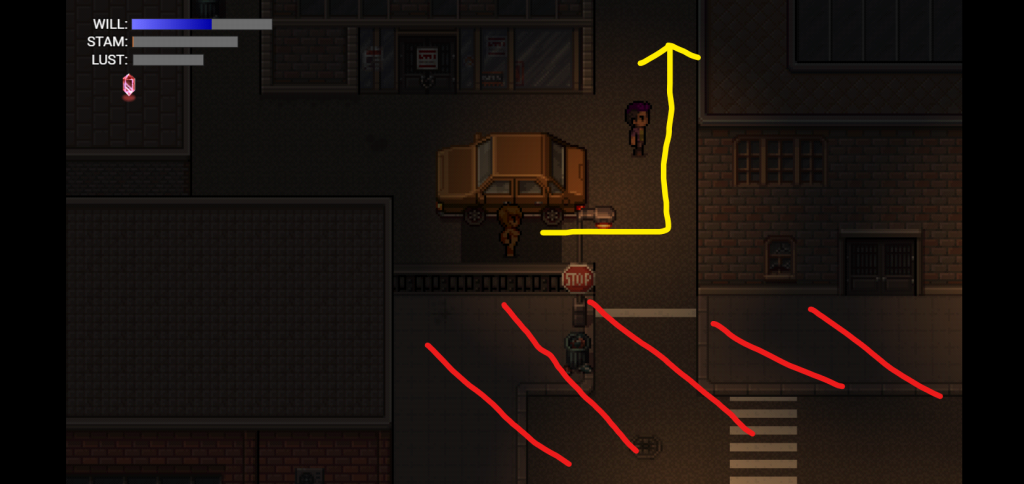
Use the car to conceal Tia, wait for the gang member to give you an opening to move north. Do not attempt to go more south as she will refuse to step onto the main roads.
Wait here. Analyze the patrol. When they move north, duck behind them and move to this concealed nook quickly. Be wary of a patrol to your east that will suddenly become visible. Occupy this nook and when you feel you have a comfortable understanding of his movements, break for either south for an event – or east to move towards Tia’s home.
Observe that here to the south is seemingly a dead end, however by talking to this man a couple times, Tia will trigger the “the twins” event and a subsequent Game Over Encounter. There is a “the twins (horny)” variant of this event depending on Tia’s lust.
If one chooses to use this path as a means of their escape, proceed through the alleyway leading east when the patrol is clear. There will be a tent visible if you continue running east. It is recommended that you use it. To the north is a convenience store with a large gathering of thugs socializing, however they can be avoided by continuing east.

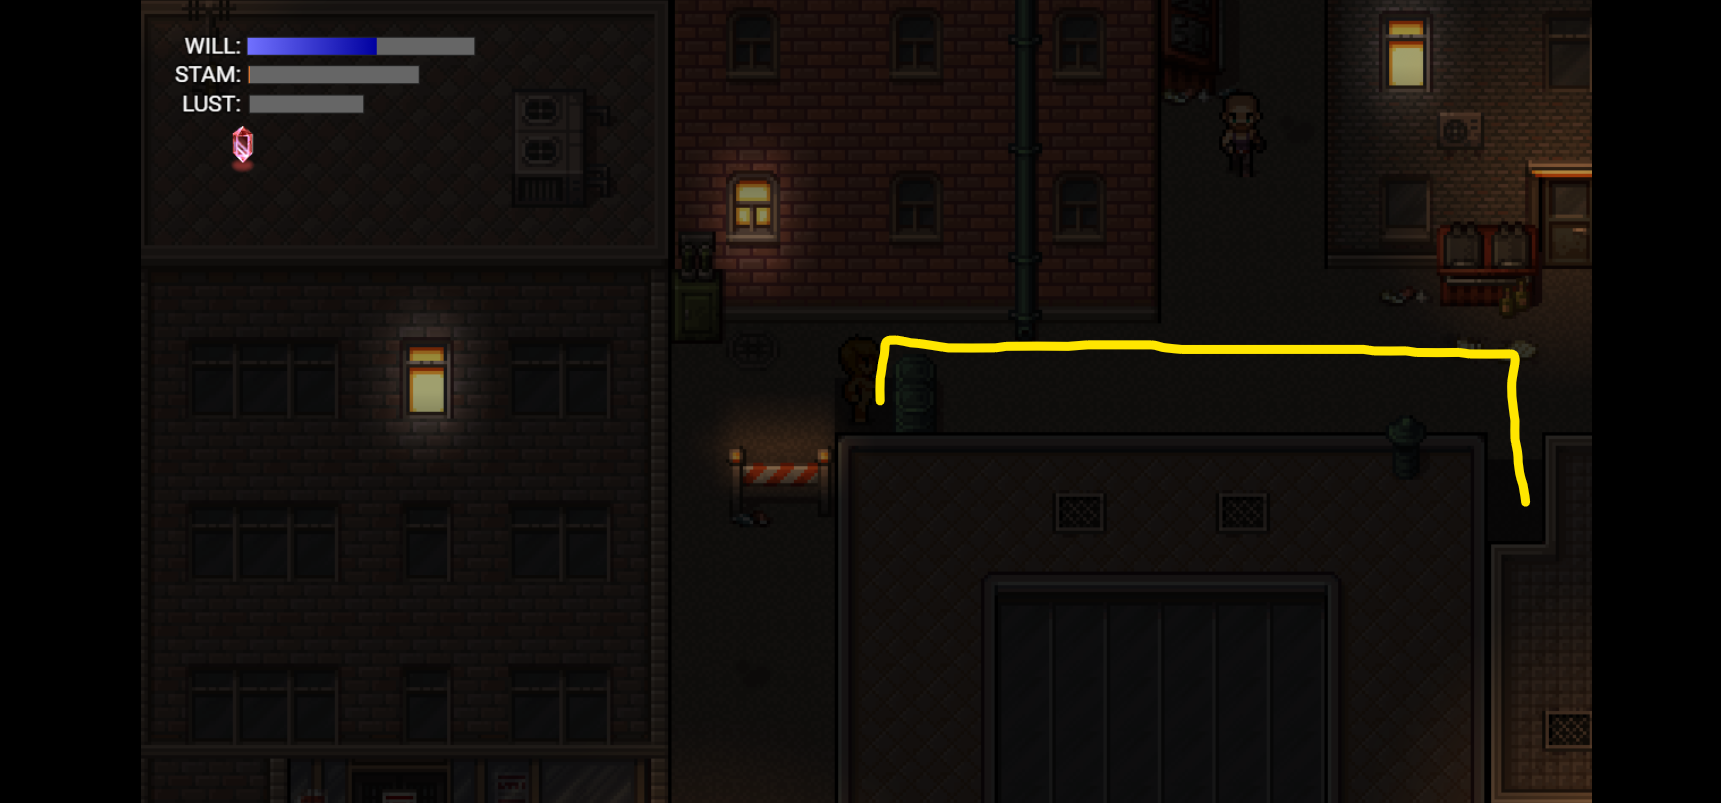
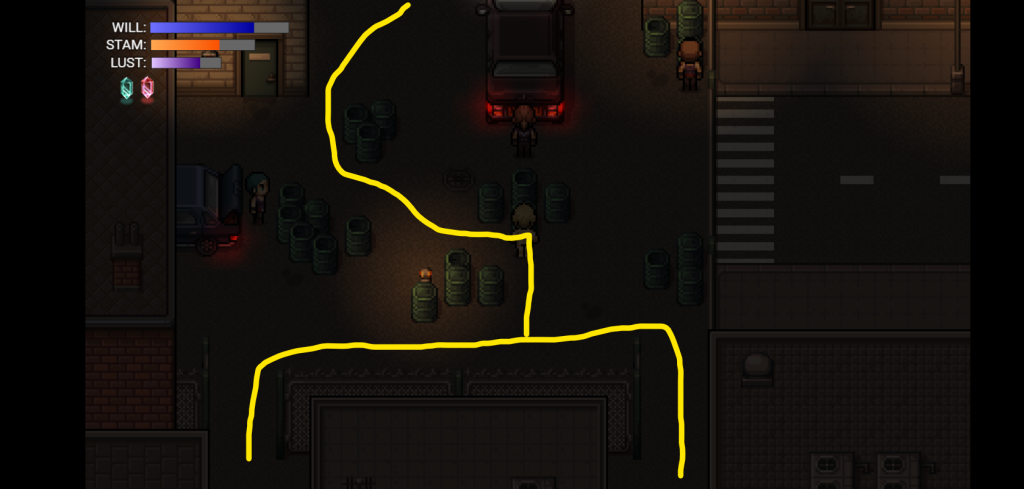
Tia will find herself in a small but guarded courtyard after crossing a street – be cautious here as a gang member will patrol north to south, south to north on a loop. They have a very lengthy patrol route but if you are very unlucky with your timing, they could easily catch Tia in the middle of the road. Proceed into the courtyard evading a single patrol on the south side and make your way counter-clockwise to a dumpster on the northeast corner and wait.
Within a moment, you will see a lecherous gang member appear from this alleyway that he patrols. He will move west and allow you to proceed north. It is very important that you do not charge into this alleyway without knowing where he is as chances are high that Tia will run straight into him. From there, proceed east and you will have cleared this section before moving to the final area of the game!
Note that while I have deigned to suggest this route, the northern path is just as viable for getting to the convenience store, although by then the path is linear and you must navigate the courtyard to reach your destination so feel free to pathfind especially if navigating Tia through this one is proving challenging. Keep in mind that the north path is populated by violent (red) thugs, and the south path by lecherous (purple) thugs.
Backstreets, North-side:
This section will be a good deal more linear. The two gangs represent your two Game Over Encounters and they are the same as they were in the previous area, no variations nor changes. To your immediate northeast is a save tent. Two tents down Tia may trigger the “sharing the tent” event. Two variants exist depending on her stats. The “sharing the tent (horny)” event which is Lust dependent and “sharing the tent (aftermath)” which is a Game Over Encounter should she not have the Willpower or Stamina to escape.
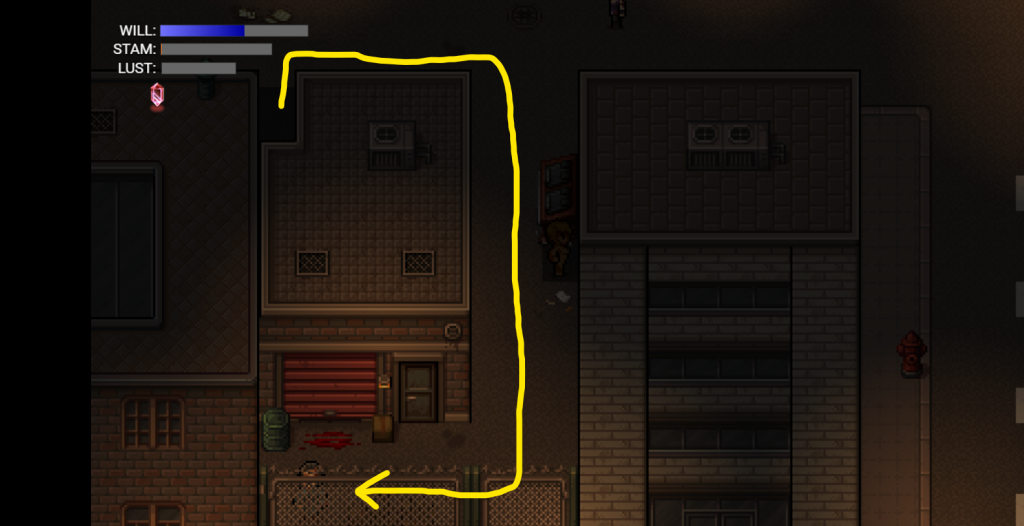
Proceed north, bypassing the lone patrol as you see fit. You will come to a small clearing with stacked tires and parked vehicles with static lookouts present. Stick to the shadows and avoid the light and their sights.
Depending on your route, you should emerge able to use the concealment offered. Be especially cautious of the thugs standing at the rear of the vehicles pictured, particularly the one at the north. They will occasionally look in alternating directions and therein lies your opportunity to slip around them.
Tia’s final save point awaits her with a tent on the side of the road. From here we will be proceeding north through a parking area. Mind the timing, slip past them. Consider alternating between arrow keys for fine movement and using Always Dash mouse clicks for quick sprints from cover to cover.
MEMORY FRAGMENT FOR TRUE ENDING:
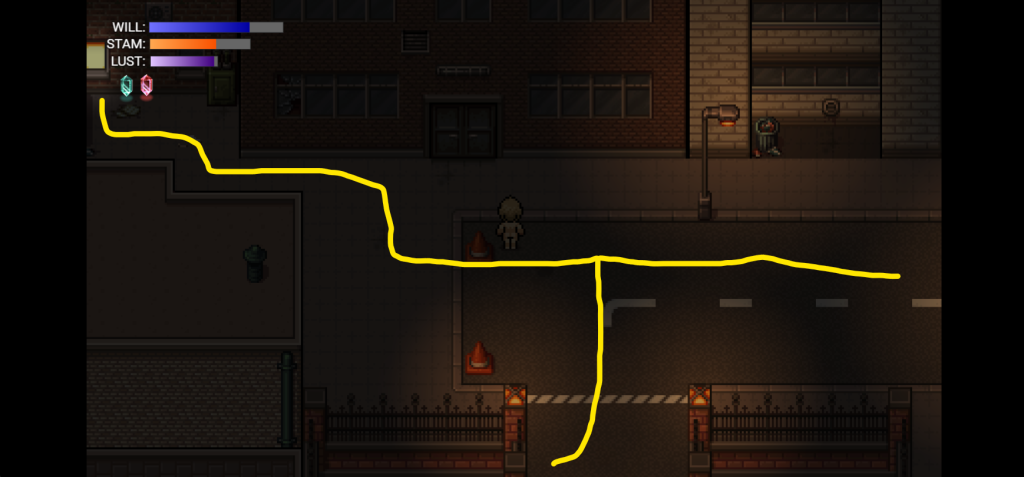
Immediately after clearing the parking area, stop. If you look to the west, you will see an illuminated window in an alley. Inspecting this will prompt flashback #4 and provided Tia’s Willpower remains mostly intact, guarantees you your True/Canon Ending!
Either way, proceed east and you are home free. Tia will approach her apartment building and you will receive an ending to her story based on how she was able to tackle the night.
If you have very high Willpower and all 4 memory fragments, you will get the true ending, otherwise, you will get the bad, neutral, or good ending based on Tia’s Willpower. Regardless of which ending you get, this will unlock the gallery.